

Seasoned salon-goers can attest to the fact that there is much more to a professional pedicure than just painting nails. First of all, there's all the prep work. This is the part that takes up the most time and for good reason since, according to experts, this the most important part of the entire process. (Prep is everything, people!) Then comes the painting. Finally, there are all the finishing touches that are responsible for making a professional pedicure look, well, professional. Sleek, shiny, and perfect are also adjectives that come to mind.
The good news is that you can replicate the results of a professional pedicure at home (really, though). All you need are the right tips, tricks, and tools to get the job done. Trust me—I'm speaking as someone who hasn't set foot in a nail salon in over two years. Keep scrolling to see a step-by-step guide to achieving the perfect at-home pedicure, according to nail experts.

Part One: Prep
Olivia Van Iderstine is the director of content and community at the buzzy nail brand Olive and June. She says that prep is the most important part of a pedicure in order to make it last and look amazing. "All the behind-the-scenes prep is what really makes the difference," she says.
So, what are the essentials needed to do the perfect pedicure at home? While you can by kits that contain all of the tools you need for a proper at-home pedi, the general consensus seems to be that a foot file and toe separators are non-negotiable while things like a footrest are handy but more of a nice-to-have.

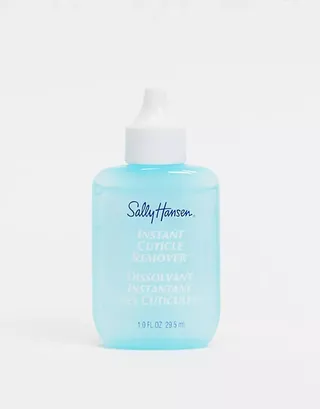
When it comes to prepping your toes, Van Iderstine recommends skipping a foot soak and opting for a dry pedicure instead. "Start with a foot file to effortlessly remove the dry, tough skin. Next, you're ready to shape and tackle your cuticles. You want to make your nail plate clean and even so that the polish goes on and stays on," she says. "We soften the cuticles with a cuticle remover so they are easily pushed back and buffed away—no cuticle cutting! A final swipe of nail polish remover ensures the canvas is ready for polish."
Sigourney Nuñez, the North America education manager at OPI, prefers to soak her feet ahead of an at-home pedicure since it softens the skin and cuticles and also offers up a nice self-care moment. "I personally like using the OPI Pro Spa Foot Soak (£26), but if you don’t have that, you can sub in a body wash and get things a little bubbly. Once you soak for about five to 10 minutes, then take a scrub and exfoliate the feet to remove the dead skin. I also really love using a pumice stone to really get rid of any stubborn callouses," she says.

Jessica Tong-Ahn, a celebrity nail artist and Smith & Cult nail ambassador, also likes to soak her feet ahead of a pedicure to hydrate and soften the skin and nails. She recommends following with an application of CND Cucumber Heel Therapy (£46).

After her soak is complete, she moves on to the next steps in her preparation process. First, she trims and files each nail to shape it. Then, she applies the CND Cuticle Eraser (£15) before gently pushing back her cuticles and trimming any loose skin with the Tweezerman Mini Nipper (£13). Finally, she buffs the surface of each nail and wipes it clean with a drop of rubbing alcohol on a small piece of a paper towel. Once that's done, she's ready to paint.
Part Two: Painting

When it comes time to apply nail polish to your toes, Tong-Ahn says a flat, steady surface is critical. I can attest to this as someone who used to paint her nails on a paper towel on her bed—not ideal. She recommends painting thin coats of colour and speeding up drying time with Zoya Fast Dry Drops (£20).
Tong-Ahn says you can't overstate the importance of taking your time. After all, the only way to truly replicate a professional pedicure is to give it the same time and focus that a nail tech would. That means no more hurriedly swiping on nail polish before running out the door.

Van Iderstine agrees that a steady surface and a clean-up brush are the secrets to achieving a perfect at-home pedicure. She recommends using a foot rest. "It props your foot up at the perfect angle so you can actually see your toes, which is essential," she says. "Once you're set up, go slow, paint each nail in two to three strokes, and don't forget to leave a little gap between your polish and skin. This is our little trick to a pro-looking finish."
Part Three: Finishing Touches

After you've finished painting your toes, don't close up your nail kit just yet. There are two finishing touches that are totally necessary if you want a professional-looking finish. The first is to clean up the edges of your paint job. All three nail experts say this super important. "A messy cuticle line is a dead giveaway you did it yourself," Van Iderstine says, "So use a clean-up brush to get a really nice precise polish line, just like you'd get in a salon."
"A clean-up brush is my best friend when it comes to all things DIY manicures and pedicures. This will help ensure you clean up any boo-boos when you paint outside the lines and ultimately give you that salon-quality finished look," Nuñez says.
If you don't have a dedicated clean-up brush on hand, Tong-Ahn says you can use an eyebrow brush instead. Just be sure to only use it as part of your nail kit once you dip it in nail polish remover. "An angled eyebrow brush can be handy to dip in acetone and wipe clean the cuticles at the end if you make any mistakes," she says.

After you've cleaned up your cuticles and any other messy lines, it's time to apply a topcoat. Even though many people skip a topcoat, when it comes to a pedicure, it's essential for two reasons. First, it makes the nail polish look glossy. Second, it makes it last. "When I use a top and base coat I can keep a manicure for up to two weeks and a pedicure for two weeks or more," Tong-Ahn says.
Van Iderstine suggests reapplying a topcoat every so often, saying, "If you're traveling (particularly someplace sandy or super active), we recommend reapplying your top coat every few days to boost shine and protect your pedicure." She also notes the importance of daily hydration. As she puts it, "feet need hydration love too!"

The Best Pedicure Colours to Wear This Summer
"I love anything bold for summer," Tong-Ahn says.

As Van Iderstine puts it, neons "instantly put you in a great mood."

Nuñez recommends this creamy sky blue shade.

Tong-Ahn also recommends a sophisticated soft mauve shade like this one.

Nuñez's go-to neutral shade is this one, which is a pink-grey nude.

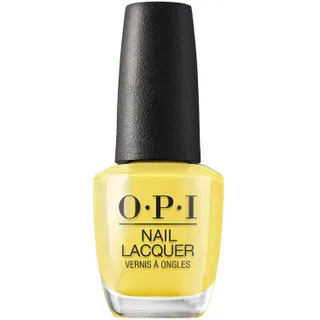
Bright orange is one of the season's trendiest shades.

A sharp and cool shade of white polish never fails.

I'm so here for this hot-pink moment.

This coral shade is practically begging to be on your toes.

You can't go wrong with this classic red colour.
Next, 11 nail trends that'll be everywhere this summer.